
This tutorial was written and all screenshots done in PSP9. You should be able to achieve similar results in earlier versions. Some of the effects you may need to search for in your dropdown lists. The tubes I've included in the supplies are courtesy of my friends Steph Staker, http://www.stakerfamily.com (cowgirl tube) and Lyle Bradshaw (cowboy tube). Please do not offer any of these materials for download anywhere, do not change file names, do not send the webpage through emails, and only offer a text link to my tutorial URL. I do not wish my tutorials to be translated, thank you. You may save an offline copy of this tutorial for your own use. Thank you for your courtesy...God bless, Diana
Supplies (same as for Sundance Animated Version):
FM Tile Tools
Other Supplies
~~~~~~~~~~
1) File/New Image: 450 x 500, Transparent. Have your Layer Palette is open.
Floodfill your layer.
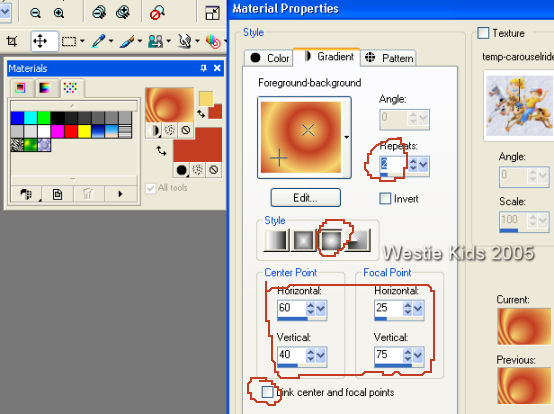
2) Add a New Raster Layer (Layers/New Raster Layer) and before floodfilling with the Gradient, make the changes below:
3) Open the .jpg files that came in the Supplies zip. I used sundown1.jpg and sundown2.jpg for my example, but you may have more fun searching for backgrounds of your own to use. Just try to get similar dimensions for yours - height greater than the width so you won't have that distorted image look.
4) Activate the sundown2.jpg then Edit/Copy.
5) Open the cowboy tube, getting ready_brad_RUK.psp.
After resizing tube, Edit/Copy.
6) Turn on your rulers, if you weren't already using them: View/Rulers (can turn off rulers later just by doing View/Rulers again).
Vertical = 0
7) Add a New Raster Layer.
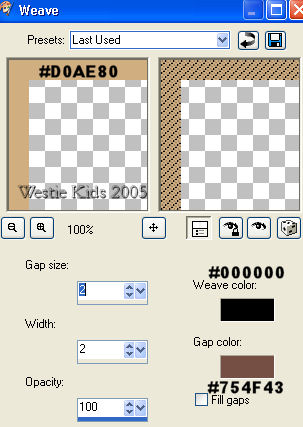
8) Effects/Texture Effects/Weave (I tried to match the cowboy's rope for this border):
Do Not Deselect.
Do Not Deselect.
9) Effects/3D Effects/Chisel: Size 2; Solid Color checked, #000000.
10) Add a New Raster Layer.
11) Effects/Texture Effects/Fine Leather: Custom 1 (in PSP9; settings below if you do not have this preset):
Do Not Deselect.
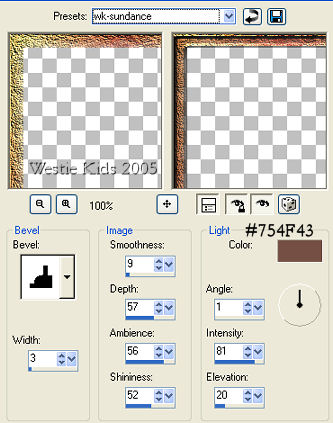
12) Effects/3D Effects/Inner Bevel (I saved my preset as wk-sundance; here's the settings):
Selections/Select None.
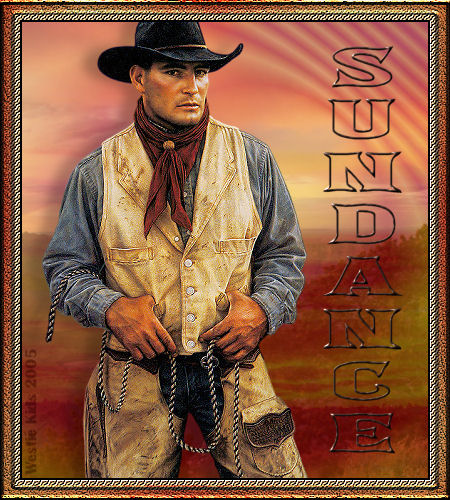
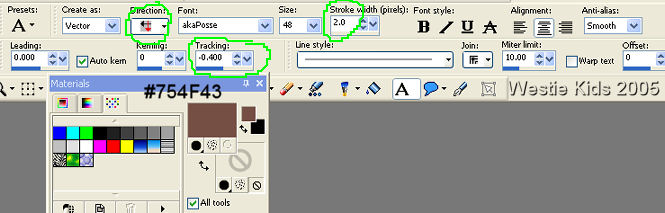
13) Ready to add our text now. If you're using another font, you may need to change the Size as well as the Tracking values. Also, if you're using an earlier version of PSP and don't have the Vertical alignment to use, just create your text and use Image/Rotate; Rotate 90 degrees right, being sure All Layers is unchecked.
Use middle node boxes on your vector text image to make your text fit inside the frame area; move text over to right, per example at top of page.
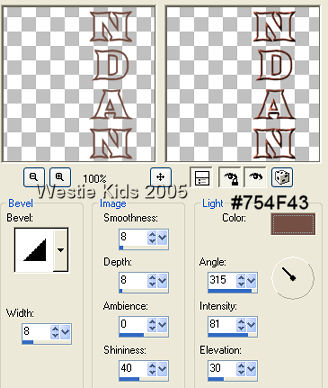
14) Effects/3D Effects/Inner Bevel. Use Angled but change only the color to your dark color (I'm using #754F43). If you don't have that preset, here are the settings:
Edit/Repeat Inner Bevel.
15) Add your watermark/signature and then File/Export/JPEG Optimizer. I set Compression Value to 15 or 20 usually. You're done!
~~~~~~~~~~
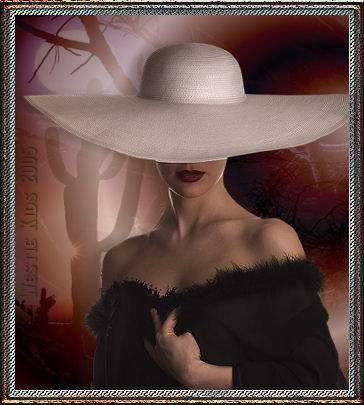
Below is a similarly done frame using different gradient settings and colors chosen from tube (this tube is not included in your supplies). The moonlight1.jpg then the sundown3.jpg from the Supplies were used. A 15px followed by a 10px border this time. Play around with your own background images, gradient settings and blend modes to see what you can come up with!
~~~~~~~~~~
I hope you have enjoyed this tutorial and perhaps learned a little something from it. If you would like to send me an email with your results, I would be delighted to see them. ..God bless, Diana
DISCLAIMER: In accordance with Title 17 U.S.C. Section 107, any copyrighted work on this site is distributed under fair use without profit or payment to those who have expressed a prior interest in receiving the included information for non-profit research and educational or criticism purposes only. http://www.law.cornell.edu/uscode/17/107.shtml
Created 09/28/05
(2 .psp files and 4 .jpg files)
Set your Foreground color to #F6D870.
Set Background color to #C43D22.
Next change to Gradient and look for the Foreground-background gradient which will be using your 2 colors. In the Style section of the Gradient window, click on Sunburst and then you will be able to UNcheck the "Link Center and Focal Points" box at the bottom. See screenshot for all the values you will enter:
Image/Flip.
Image/Mirror.
Click on your Gradient in the Material Palette and change just the Center Point and Focal Point values as below:
Center Point Horizontal = remains at 60.
Center Point Vertical = change from 40 to 15.
Focal Point Horizontal = change from 25 to 61.
Focal Point Vertical = change from 75 to 43.
Now floodfill this 2nd layer with the changed gradient.
In your Layer Palette, change the Opacity of this layer to about 50.
With the sundown1.jpg active on your desktop, Edit/Copy.
Go back to your working 450 x 500 image.
Add a New Raster Layer then Selections/Select All to get the "marching ants" marquee.
Edit/Paste Into Selection (to add the sundown1.jpg into the entire 450x500 area).
Lower the Opacity in your Layer Palette on this layer to about 50 and change the Blend Mode from Normal to Burn.
Selections/Select None.
Go back to your working 450 x 500 image.
Add a New Raster Layer then Selections/Select All.
Edit/Paste Into Selection (to add the sundown2.jpg into the entire 450x500 area).
Lower the Opacity of this 4th layer to about 50; don't change Blend Mode.
Selections/Select None.
Shift+D (or Window/Duplicate) and then close the original tube to save for another day.
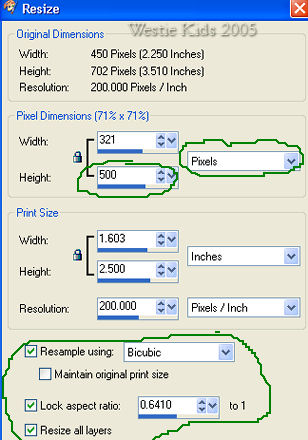
Image/Resize per screenshot. Just need to key in height of 500 (width will automatically adjust with the Lock Aspect Ratio being checked):
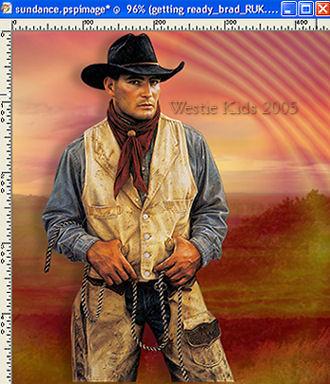
Edit/Paste as New Layer.
Click on your Mover Tool and then just click your mouse on the cowboy tube. You will then be able to use your right/left/up/down arrow keys on the keyboard to "nudge" the tube over to the left by clicking several times (see screenshot below; I have about 40 pixels to the left of his elbow). Don't worry too much about positioning yet as we will not be merging any of our layers. You can go back later to this layer if need be.
Effects/3D/Drop Shadow:
Horizontal = -15 (minus 15)
Opacity = 25
Blur = 15
Color = Black
Shadow on New Layer = UNchecked
Change your Foreground color to #d0ae80 (zeroes) - this is a light tan color.
Selections/Select All.
Selections/Modify/Contract: 20.
Selections/Invert.
Floodfill the 20px border we now have with the #d0ae80 color.
Do Not Deselect.
FM Tile Tools Blend Emboss at default values; apply twice:
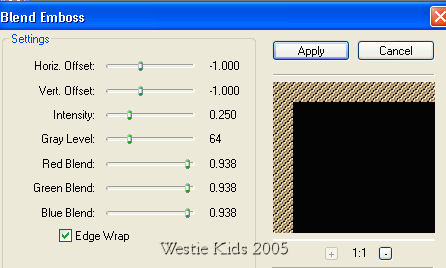
Selections/Select None.
Selections/Select All.
Selections/Modify/Contract: 15.
Selections/Invert.
Again set your Foreground color to #F6D870 (from Step 1)
Set Background color to #C43D22 (from Step 1).
Change to Foreground/background Gradient again and use the values in the screenshot for Step 1 to floodfill this 15px border.
Do Not Deselect.

Note: If you're using a different image, you may want to change the bevel color to a dark color from your image (I used #754F43).
Then Objects/Align/Vert. Center in Canvas.
Right click vector layer in Layer Palette and Convert to Raster Layer.
(Be sure to change your text Direction back to Horiz. and Down, Stroke back to 1.00 and Tracking back to 0.000).
I did not use a Drop Shadow on the text as I wanted the background to show thru the font.
Revised 07/12/06
Westie Kids/Diana Dorsey 2001-2007
(all rights reserved)
Thank You and God bless........Diana