
This tutorial was written in PSP X (I do have screenshots for PSP8-9 differences). You should be able to achieve similar results in versions 8 and up. You may need to search for some of the effects in your PSP's dropdown lists. Please do not offer any of the supplies for download anywhere, do not change file names, do not send the webpage through emails, and only offer a text link to my tutorial URL. I do not wish my tutorials to be translated. Thank you for your courtesy...God bless, Diana
What We'll Be Using:
Xero Plugins, Freeware
Mehdi Plugins, Freeware
Supplies - Tube, Font, 6 Brushes:
~~~~~~~~~~
Thanks to my friends Ginny Hopping (flower brush) & Steph Staker (lady tube)
~~~~~~~~~~
1) If you didn't already have them and just installed the plugin(s), you'll need to first close PSP and then bring it back up for the new plugin(s) to be available.
2) File/New: Width=600, Height=500, Raster Background, Color=Transparent.
3) Open tube (blondonphoneAV_sjs.psp) and Edit/Copy.
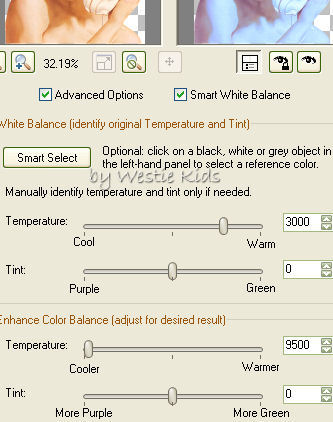
4) For PSP X: Adjust/Color Balance; check Advanced Options for list and change the values as shown below, then click OK:
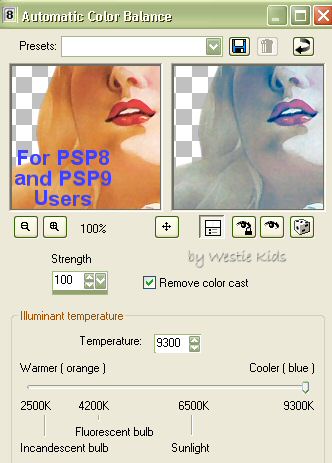
For PSP 9: Adjust/Automatic Color Balance then see screenshot below:
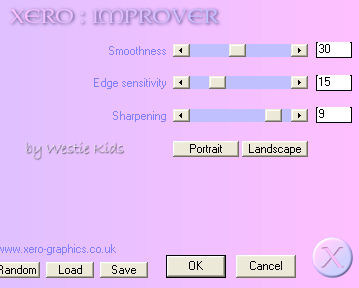
5) Effects/Plugins/Xero: Improver - highlight and type over numbers to change values; but don't click Portrait or Landscape, and then click OK:
6) Effects/Edge Effects/Enhance.
Still on Duplicate layer, change Opacity to 30 (you can click in the number area to use slider or your left arrow key will change the value 1 pixel at a time).
7) Hide your bottom, transparent layer, by clicking on the "eye" on the Layer Palette. Click on either of the tube layers to activate, then right click on that layer and Merge/Merge Visible.
8) Now click on your bottom, transparent, layer to activate.
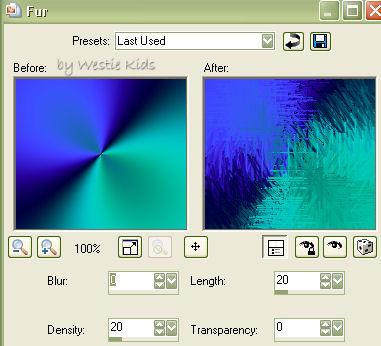
9) Effects/Texture Effects/Fur with these values:
Effects/Edge Effects: Enhance
10) Add a new Raster Layer and set your Foreground color to white, #FFFFFF.
11) I added Ginny's brush in different sizes, each on a new layer, like so:
Top left, size 100, clicked brush 3 times, blend mode Dodge
(I also used Effects/Edge Effects/Enhance on the size 225 brush)
12) Here's how your image should look now (screenshot created in PSP9 so you can see each layer's blend mode):
13) Click on top layer to activate; we'll be adding our text above the tube. Find the CrazyCrazy.ttf font on your hard drive; double click on it to make available for PSP, if it's not already opened. In your Material palette make your Foreground #FFFFFF and Background #000040. Click on your A (text) Tool on the toolbar using these settings for your name:
(If your name is long, you may need to change text size to about 90, and not rotate the text)
Image/Rotate/Free Rotate: Right, 90 degrees, making sure All Layers is UNchecked.
14) We want to use a copy of our bottom layer, the wavy lab/fur effect, so click on layer to activate. (When testing, I liked the text effect we'll create using the entire 600x500 background for the pattern, not a cropped portion, and not making it seamless).
15) Back on our working image, click again on the text layer to activate:
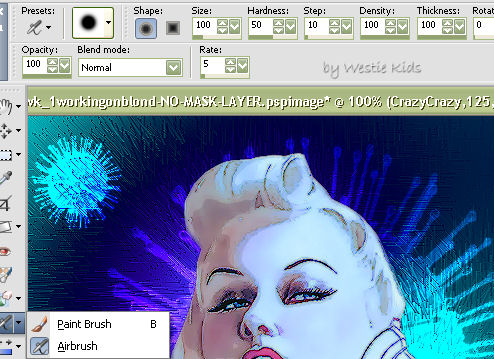
16) Add a New Raster Layer(s). At this point I added two of my "Moody Blues" word art brushes, each on a new layer. Click on the Paintbrush Tool and find the wk-... brushes. The placement and sizing is your choice, and you may want to experiment with the Opacity and Blend Modes, other brushes of your choice, or placing them behind the tube, etc., but here's how I did my sample: wk-Lyrics-MoodyBlues-3, size 200 (at top right); color #FFFFFF, hold mouse steady, click 3 times;
wk-Lyrics-MoodyBlues-1, size 275 (at bottom left); color #ffffff, hold mouse steady, click twice;
17) Add a layer for your watermark, or just do as I did with my http://westiekids.com seen at bottom right:
18) If you like, once you have everything positioned, go back and click on your tube layer and add a Drop Shadow. Here's what I used on mine:
Vertical = 0
19) Almost finished now, and if you'd like to have these layers to use portions of later, save now as .pspimage.
20) With the duplicate copy we'll be adding borders which forces the layers to be merged/flattened. (Note in the screenshot that if you right click your mouse on the color box of the Add Borders window, it will pop up another window, Recent Colors - your Foreground and Background colors will be shown at the bottom left of this window, so you can click on the dark blue to place it in the Add Borders box and next time click on the other color for your next border. Also, if you're doing a tut with several different colored borders, if you left click your mouse on the Add Borders color box, it will bring up the Color window to key in your HTML color, then it will be shown at the top left of the Recent Colors box next time you add borders. Makes it much easier to add borders than in the early PSP versions, doesn't it?).
21) Image/Add Borders and add a 1px symmetric, color #009388.
22) We're finished! File/Export/JPEG Optimizer: I like to use the defaults with Set compression value 20.
~~~~~~~~~~
I hope you have enjoyed this tutorial and perhaps learned a little something from it. If you would like to send me an email with your results, I would be delighted to see them. ..God bless, Diana
DISCLAIMER: In accordance with Title 17 U.S.C. Section 107, any copyrighted work on this site is distributed under fair use without profit or payment to those who have expressed a prior interest in receiving the included information for non-profit research and educational or criticism purposes only. http://www.law.cornell.edu/uscode/17/107.shtml
Created 08/22/06
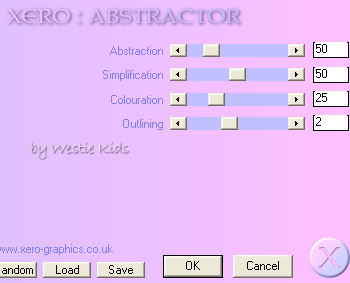
We'll be using Improver from Xero Plugin Set 3 and Abstractor from Xero Plugin Set 4.
Create a folder named Xero in your Plugins folder and extract all .zip file contents to it.
We'll be using Wavy Lab 1.1. Scroll down to almost bottom of page for Download link.
Create a folder named Mehdi in your Plugins folder and extract .zip file contents to it.
(Extract brushes, they work in PSP8 & up, to a temporary folder - they must be IMPORTED into PSP):
My good friend Ginny has a great tutorial on Importing Brushes Bunny's Attic
for allowing me to include their work in my download!
Make sure your Layer Palette is available, if not, View/Palettes/Layers.
Remember to save your work frequently as .pspimage!
Go back to your transparent file and Edit/Paste as New Layer.
User your Mover Tool to place tube over to the bottom left as in my sample.
You may close the original tube now.
For PSP 8: Adjust/Color Balance/Automatic Color Balance; change to values below, then click OK:
Right click on your tube layer in the Layer Palette and Duplicate.
On the Duplicate layer, go to Effects/Plugins/Xero: Abstractor using values below, then click OK:
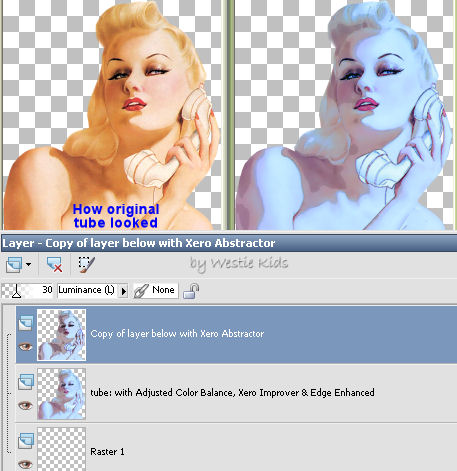
Click on Normal and change your Blend Mode to Luminance (Legacy).
Here's how the effects look so far, compared to the original tube (Layer Palette also shown):
Click again on the "eye" to unhide the layer.
(Note: I did not need to fill this layer with a color for the next plugin effect to work, but if yours doesn't, just first fill with white).
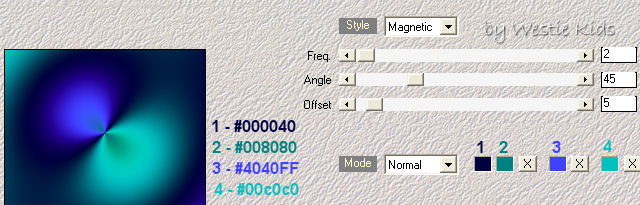
Effects/Plugins/Mehdi: Wavy Lab 1.1 (pay close attention that you change all the values as shown. Just click your left mouse button on the color boxes and then type in the HTML colors I've shown). You'll see the wavy gradient image we want in Mehdi's preview window; then click OK:
Click on your Paintbrush Tool and find Ginny's flower brush, gh_flower14, default values (size 500). Hover your brush over the image to see the outline, then click once near the center of the space and you'll see the brush "peeking" from behind our tube layer.
Click on Normal on Layer Palette and change the Blend Mode to Dodge.
Bottom right, size 75, clicked brush once, blend mode Luminance (Legacy)
Left (partially behind tube), size 225, clicked brush once, blend mode Luminance (Legacy)


Right click mouse on layer pallette and Convert to Raster Layer.
Click on your Move Tool; move text where you want it.
Edit/Copy and then Edit/Paste as New Image. Minimize this in your workspace.
Click on Foreground color in your Material Palette and change to Pattern. Locate our new image near the top of Pattern dropdown list. Change Scale to 10.
Click on your Airbrush Tool (click on arrow next to Paintbrush tool for it) and use these settings.
Selections/Select All
Selections/Float
Selections/Modify/Contract 3
Now just click your mouse over the entire area, filling with the pattern we set to Scale 10. Don't worry about "coloring outside the lines" since the selection marquee around the area will keep your painting inside it.
After coloring all the letters, and while still selected,
Effects/Edge Effects/Enhance, then Edit/Repeat Enhance Edges.
Selections/Select None.
Effects/3D Effects/Drop Shadow with Vert. and Hor. 1, Opacity 100, Blur 1.00
Change Opacity to 65, Blend Mode to Screen.
Effects/3D Effects/Drop Shadow: with Vertical & Horizontal both 1, Opacity 100, Blur 1.00.
Change Opacity to 50, Blend Mode to Hard Light.
Effects/3D Effects/Drop Shadow: with Vertical & Horizontal both 1, Opacity 100, Blur 1.00.
Vector Text, Arial, size 10, Stroke at 0 (or close off the Foreground color), and Background color set to #FFFFFF.
Type in your text, Convert to Raster, change Opacity to 45, Blend Mode to Screen.
Depending on where you place this "watermark" text, you may need to experiment with Opacity and Blend Modes.
Horizontal = -10 (minus 10)
Opacity = 40
Blur = 15.00
Color = #000000
Then Window/Duplicate (or Shift+D) to get another copy and close the one we've been working on.
Change your Foreground color to #000040 and Background color to #009388 so we can swap back and forth with some borders.
Image/Add Borders and add a 2px symmetric, color #000040.
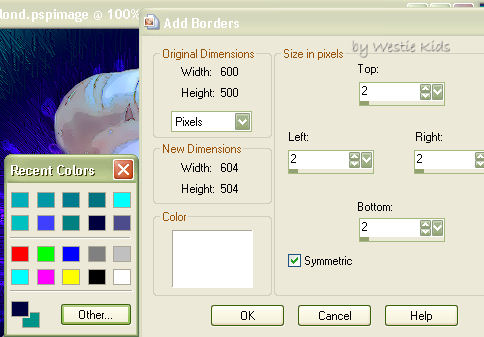
Image Add/Borders and add another 2px symmetric, color #000040.
Westie Kids/Diana Dorsey 2001-2007
(all rights reserved)
Thank You and God bless........Diana