

This tutorial was written and all screenshots done in PSP9. You should be able to achieve similar results in other versions. Some of the effects you may need to search for in your PSP's dropdown lists. Please do not offer any of the supplies for download anywhere, do not change file names, do not send the webpage through emails, and only offer a text link to my tutorial URL. I do not wish my tutorials to be translated, thank you. You may save an offline copy of this tutorial for your own use. Thank you for your courtesy...God bless, Diana
Supplies:
Penta Garbage Collections Plugin
~~~~~~~~~~
Remember to save your work frequently.
1) File/Open and find the .jpg image you wish to use (I'm using model5.jpg included in Images zip for main example).
2) Foreground Color: #79472e (or use your dropper tool and choose a DARK color if using another image.
Change your Background to Pattern in Materials Palette and locate the duplicated image.
3) Effects/Texture Effects/Weave:
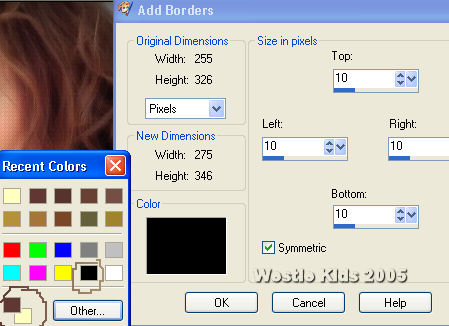
4) Image/Add Borders: Symmetric Checked; Border = 1px; Color = #000000.
5) Image/Add Borders: 10px #FFFFC0 (right click on the black of the Add Borders window which pops up Recent Colors used window. At bottom left of that popup window are your current Foreground and Background solid colors and the black is there as well - so you can easily toggle back and forth with adding borders):
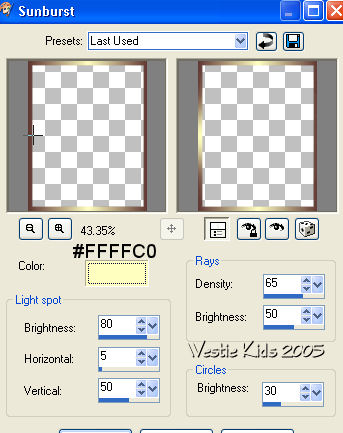
Use your Magic Wand to click on the 10px border (Tolerance and Feather both = 0) and then fill with the Gradient.
Repeat Sunburst effect, changing Horizontal to 95.
6) Image/Add Borders: 1px #000000.
7) Image/Add Borders: 20px #FFFFC0.
8) Now right click on your Promoted Selection and Duplicate.
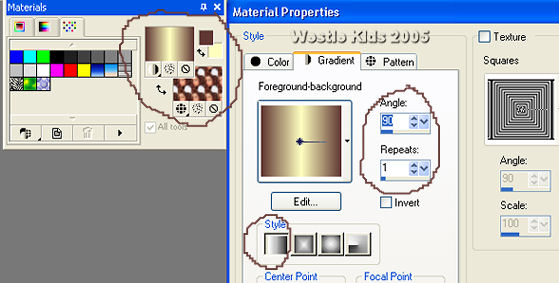
9) In the Materials Palette, change Background from Pattern to Gradient and find the Foreground/background gradient.
Note: If you just clicked on double-headed arrows to Swap Materials, the Gradient we've been using on the Foreground would swap to become the Background, but so would the solid colors, changing the look of the Gradient.
10) Find where you downloaded the font from my Supplies and double click to open it for use.
You may need to change the size depending on the length of your text.
11) Effects/3D/Drop Shadow: Vert. and Horiz. = 1, Opacity = 100, Blur = 1.00.
12) Be sure you're on your top layer, then Add a New Raster Layer.
13) Add your signature/watermark and then File/Export/JPEG Optimizer (I usually Set Compression Value between 15 and 20 for most projects). That's it! ;o)
I hope you have enjoyed this tutorial and perhaps learned a little something from it. If you would like to send me an email with your results, I would be delighted to see them. ..God bless, Diana
DISCLAIMER: In accordance with Title 17 U.S.C. Section 107, any copyrighted work on this site is distributed under fair use without profit or payment to those who have expressed a prior interest in receiving the included information for non-profit research and educational or criticism purposes only. http://www.law.cornell.edu/uscode/17/107.shtml
Created 10/13/05
(NOTE: If a Language Pack Installation box pops up - just click CANCEL.
The Plugin icon and download link are in English. Create a folder named
Penta in your Plugins folder and extract garbage_collections.zip contents to it.
We'll use Drag but there are other nice effects you might like).
Windows/Duplicate (Shift+D) TWICE - we'll need 2 copies.
Minimize one of them.
Close the original so you can use it for another project.
Background Color: #FFFFC0 (use this color even if you're using another image and/or foreground color). NOTE: If you want a silvery border, use #C0C0C0 instead of #FFFFC0 for the Background color and then use the #C0C0C0 every place I show you to use #FFFFC0 for the remainder of the tutorial (including the Sunburst effect). This is from my friend Ginny's testing of the tutorial - thanks, Ginny! See her results and several more from my other tester's:
Use Angle = 0 and Scale = 50.
Change your Foreground to Gradient and locate the Foreground-background gradient; changing values as in screenshot.
Gap Size = 1
Width = 1
Opacity = 10
Weave Color = #000000
Gap Color = N/A
Fill Gaps Box = UNchecked
(not using a Gap Color, so if you have a color in the Gap Color box it won't be seen as long as the Fill Gaps Box is UNchecked)
Selections/Select All.
Selections/Modify/Contract: 1
Effects/3D Effects/Cutout: Vert. and Horiz. = 0; Opacity = 75; Blur = 100.00 (yes, one hundred); Shadow Color = #000000.
Selections/Select None.
Effects/Illumination Effects/Sunburst:
Selections/Select None.
(Notice with our gradient background color the same as the Sunburst color, #FFFFC0: the gradient's glow is at the top and bottom, from the 90 degree Angle, when we floodfill. Then the Sunburst effect puts the same glow on the left and right sides, giving more of a sheen).
Use Magic Wand to click on border.
Floodfill with the Pattern of the image we had set up in the Material Palette, Angle 0 and Scale 50.
Adjust/Blur/Gaussian Blur: 15.00.
While the 20px border is still selected go to:
Effects/Plugins/penta.com/Drag. Leave the Threshold at the default value of 142 and click on OK.
On your Layer Palette (I always keep mine open), right click on your layer and
Promote SELECTION to Layer (NOT Promote Background Layer).
Selections/Select None.
On the Copy of Promoted Selection, go to Image/Mirror.
On your Layer Palette, click on 100 to change Opacity to 50 on BOTH Promoted Selection layers. (You can drag on the double arrows there to move back and forth, or just click your mouse on the Opacity area and then use your keyboards' left and right arrow keys to move back and forth).
Click on Normal to change the middle layer's blend mode to Burn (see below):

Our Foreground should still be #79472e (or your own DARK color) and the Background #FFFFC0.
We want Angle 0 this time with Repeats 1.
Close off your Foreground Gradient (make transparent/null):
Click on your Text Tool and use values below (doesn't matter Stroke shows 1.0; Foreground is closed so there will be no stroke).

Position your cursor on the innermost black border to use as a guide placing text. Once text is applied, while still a Vector, hold down your Shift Key and use your keyboard arrows (the group of 4 keys) to nudge your text to sit more on the line. Once nudged to where you want, right click in your Layer Palette and Convert to Raster Layer.
Selections/Select All.
Selections/Modify/Contract: 1.
Selections/Invert.
Floodfill with #000000 (you may need to click on your Zoom Tool and then Zoom in More to be able to floodfill that 1px border).
Selections/None.
Revised 07-12-06
Westie Kids/Diana Dorsey 2001-2007
(all rights reserved)
Thank You and God bless........Diana