

This tutorial was written in PSP X but you should be able to achieve similar results in other versions. You may need to search for some of the effects in your PSP's dropdown lists or the Help window. Please do not offer any of the supplies for download anywhere, do not change file names, do not send the webpage through emails, and only offer a text link to the tutorial URL. I do not wish my tutorials to be translated. Thank you for your courtesy...God bless, Diana
What We'll Be Using:
SUPPLIES:
Images Here
(My 4 backgrounds, 1 AMG Tube and Mask 055.jpg)
Many thanks to Anna Marie Gonzalez for allowing me to share her beautiful Santa tube!
Special thanks to Ginny for testing my tutorials! MORE SAMPLES HERE
~~~~~~~~~~
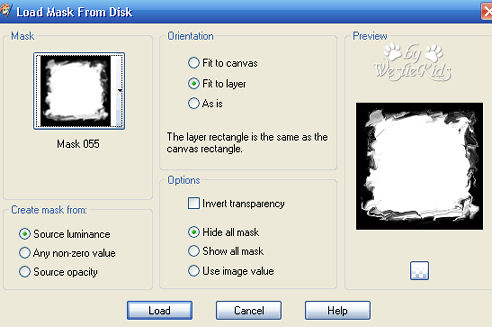
1) File,Open - Open Mask 055.jpg and minimize it (came with PSP8 so you may already have it in your Masks folder).
2) File,Open - Choose one of the 4 background files included in Supplies - I used wk_green-background.jpg for above sample (they are similar designs, but each a little different).
Make a duplicate (Shift+D or Windows/Duplicate) of the background file and close the original.
3) Layers,New Mask Layer,From Image (if you're using the minimized Mask 055.jpg) OR if you had it in your Masks folder, go to Layers,Load/Save Mask,Load Mask From Disk (see appropriate screenshot below):

Right click on Layer Palette on your Mask layer, Merge, then Merge Group.
4) Edit, Copy (we'll be pasting this onto a new, larger file).
File, New, Width=600, Height=600, Color=White.
Edit, Paste as New Layer.
You can now close the 500x500 copy; we'll be working on the new image now.
5) File, Open - Open another of the backgrounds from the Supplies - I used wk_red-background.jpg.
Make a duplicate (Shift+D or Windows/Duplicate) of the background file and close the original.
Image, Resize: Width & Height=40%, Resample=Bicubic, Lock aspect ratio=Checked, Resize all layers=Checked.
Load Mask as we did in Step 3. And paste onto the 600x600 image as we did in Step 4.
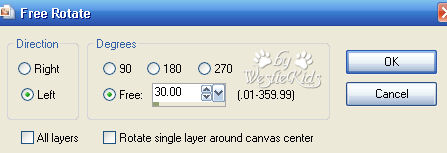
6) Image, Free Rotate, Left:30.
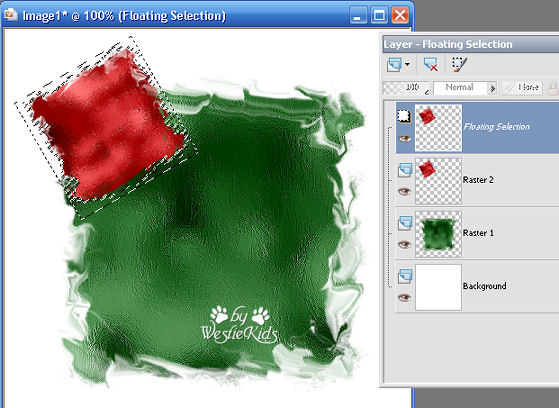
7) Use your Mover Tool to move the red square to the upper left.
To make sure the edges don't extend beyond our workspace and cause unsightly cutoffs, we'll float the image to see that the edges are inside our 600x600 file.
Selections, Float (see below):
If you need to move the red square, first you must deselect (Selections, Select None).
Then move it a little and Float again to be sure. Once it's in position, Selections, None.
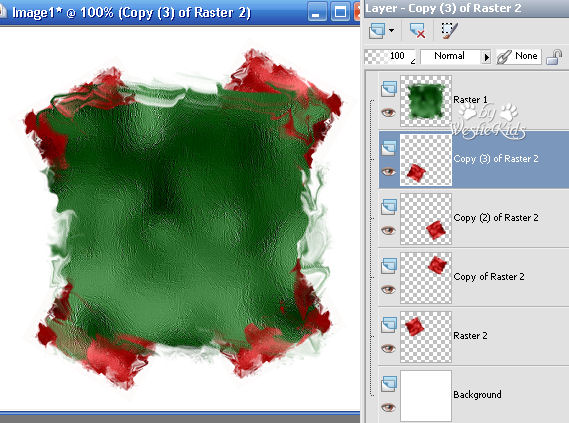
8) Now we'll make copies to decorate the other 3 sides:
On your Layer Palette, right click on the red square layer then click on Duplicate.
Image, Mirror.
Right click on this layer, Duplicate and then Image, Flip.
Right click on layer, Duplicate, then Image, Mirror.
I then used my Mover Tool to move some of them inward (you can also use the Deform Tool to one or more slightly, being careful not to get them outside the working space).
You could also make copies of the different color backgrounds, resizing and adding the mask to decorate instead of having all one color on the corners (like another of my samples).
Then click on Layer Palette on your main background, the green one to activate it, and Arrange, Bring to Top. (If you want to move any of the red squares after bringing the main image to the top, hide the green layer - click on the Visibility Toggle, the eye, on it's layer - or you'll accidentally move it instead). Here's what we have so far:
9) Click on the top layer to be sure it's the one activated. File, Open your chosen tube - I'm using Anna Marie's beautiful Santa tube that was included in your supplies.
Edit, Copy and Paste onto your working image. Move it over to the right side.
Image, Resize: 90% twice.
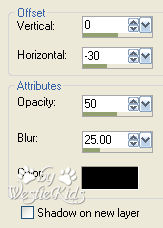
Effects, 3D Effects, Drop Shadow: Vertical = 0, Horizontal = -30 (minus 30), Opacity = 50, Blur = 25.00. If you want to add your tube to the left side of the image, use Horizontal = 30 instead.
10) We're ready to add some text - I'm using Dreamer One, that you downloaded for this tutorial. If you use something else, the text size and effects may need to be changed.
For my "Christmas 2007" text I used two lines, so I changed the Leading to make the lines closer together. If you use only 1 line of text, Leading can remain at 0.000.
Notice I am also using Alignment, Left (your choice).

In your Material Palette, close the Foreground Stroke and change the Background fill to #2d7535.
Type your text: Selections, Select All; Selections, Float and add the following: Effects, 3D Effects, Inner Bevel:
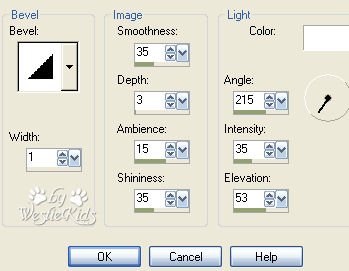
Repeat the Inner Bevel.
Selections, Select None.
Effects, 3D Effects, Drop Shadow: Vertical & Horizontal = 2, Opacity = 30, Blur = 5.00.
11) I added a second text "Seasons Blessings", Text Size = 36, and changed the Background fill to #ffffff, White.
I rotated it to the left, added the same Inner Bevel (twice) and the same shadow as in Step 10.
12) At this point, I clicked on my green background layer and went to Image, Flip so the darker section was at the top to better show off the texts.
13) Add your copyright or watermark to your file. If you have the image as you'd like, close the Visibility Toggle (the eye) on the bottom, White layer. Click on your top layer to activate it and then click on your Selection Tool.
Click on the Merged Opaque icon.
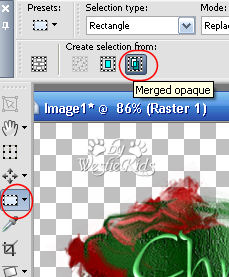
This puts a marquee around the image so we can cut off the excess space without chopping off any of our image.
Image, Crop to Selection.
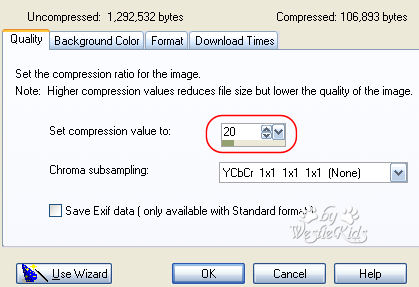
14) Unhide your white background layer and then go to File, Export, JPEG Optimizer. I usually have 20 in the "Set compression value to" window, changing nothing else and then click OK.
Congratulations! Your tag is finished!
I hope you have enjoyed this tutorial and perhaps learned a little something from it. If you would like to send me an email with your results, I would be delighted to see them. ..God bless, Diana
~~~~~~~~~~
DISCLAIMER: In accordance with Title 17 U.S.C. Section 107, any copyrighted work on this site is distributed under fair use without profit or payment to those who have expressed a prior interest in receiving the included information for non-profit research and educational or criticism purposes only. http://www.law.cornell.edu/uscode/17/107.shtml
Created 12/16/07
Westie Kids/Diana Dorsey 2001-2007
(all rights reserved)
Thank You and God bless........Diana